Many corporations prefer to add branding to the
front-end layout of their SharePoint farm. Usually this is done on the
master pages. Specifically the v4.master
is often the one that corporations change. This is all fine for normal
sites, but in many cases special attention needs to be paid to the
search center, as the v4-based master pages break the search center.
1. Search Box Is Hiding When Branding a Search Center
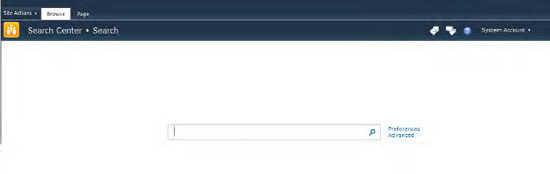
Figure 1 shows the standard search page in a search center. Pay attention to the search box, as this is the root of the problem.
Normally a site collection
is created with a search center underneath. Alternatively this is done
by creating a publishing portal that already has a search center
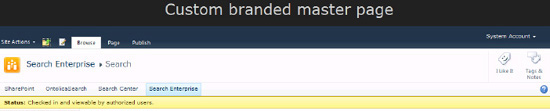
created. The next step is usually to apply the corporate custom branded
master page to all subsites. For a fictive corporation, it could look
something like Figure 2.
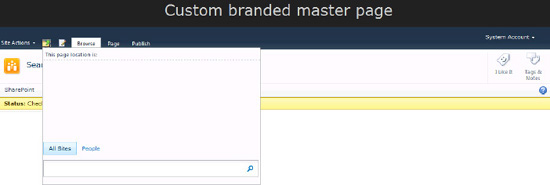
Now the search page has
the custom branded layout, but the search box has disappeared. This is
because the search center doesn't support the v4 master pages. The
search box is not gone; it is actually hidden in the breadcrumb
placeholder.
This works just fine when minimal.master is applied, but as mentioned, the layout problem, shown in Figure 3,
happens when trying to apply any of the other out-of-the-box v4 master
pages or a custom branded master page simply by clicking the "apply to
all subsites" box.
2. Making Navigation Visible and Showing the Search Box Correctly
This can obviously be fixed by creating a new custom branded master page based on the minimal.master
or by adjusting the page layouts in the search center to use the
standard content placeholders. In this case, it is recommended, however,
to create a new custom branded master page based on the current custom
branded master page. With minor adjustments, it can be modified to work
with search centers. This approach makes it easier to maintain the
master pages in the future.
In Listing 1, a copy of the v4.master
is modified to work with search centers. This is also useful if the
purpose is just to add normal navigation to the default SharePoint 2010
Search Center. Basic knowledge about master pages and SharePoint
Designer 2010 is assumed.
Make a copy of v4.master, and give it a new name like v4_searchcenter.master. Then edit the new master page. Then find and remove the tag named PlaceHolderTitleBreadcrumb. Now the breadcrumb will work as expected without it being located in the drop-down placeholder.
Example 1. Removing ContentPlaceHolder Wrapping of the Breadcrumb
<asp:ContentPlaceHolder id="PlaceHolderTitleBreadcrumb" runat="server">
<SharePoint:ListSiteMapPath
runat="server"
SiteMapProviders="SPSiteMapProvider,SPContentMapProvider"
RenderCurrentNodeAsLink="false"
PathSeparator=""
CssClass="s4-breadcrumb"
NodeStyle-CssClass="s4-breadcrumbNode"
CurrentNodeStyle-CssClass="s4-breadcrumbCurrentNode"
RootNodeStyle-CssClass="s4-breadcrumbRootNode"
NodeImageOffsetX=0
NodeImageOffsetY=353
NodeImageWidth=16
NodeImageHeight=16
NodeImageUrl="/_layouts/images/fgimg.png"
RTLNodeImageOffsetX=0
RTLNodeImageOffsetY=376
RTLNodeImageWidth=16
RTLNodeImageHeight=16
RTLNodeImageUrl="/_layouts/images/fgimg.png"
HideInteriorRootNodes="true"
SkipLinkText="" />
</asp:ContentPlaceHolder>
|
Next, add the PlaceHolderTitleBreadcrumb before the PlaceHolderMain. This will allow the search center to inject the search box in a good location:
<asp:ContentPlaceHolder id="PlaceHolderTitleBreadcrumb"
 runat="server"></asp:ContentPlaceHolder>
<asp:ContentPlaceHolder id="PlaceHolderMain" runat="server"/>
Move PlaceHolderPageTitleInTitleArea (and any supporting HTML) to a hidden panel because this placeholder isn't used the same way in the search center:
<asp:ContentPlaceHolder id="PlaceHolderPageTitleInTitleArea" runat="server" />
<asp:Panel visible="false" runat="server">
<asp:ContentPlaceHolder id="PlaceHolderPageTitleInTitleArea" runat="server" />
</asp:Panel>
Remove ClusteredDirectionalSeparatorArrow and <h2></h2>. It won't make sense to show these at the top now:
<SharePoint:ClusteredDirectionalSeparatorArrow runat="server"/>
<h2></h2>
3. Adding CSS Styling
To make the master page look correct for search centers, some CSS needs to be added. The CSS styles in Listing 2 are added to the <head> section of the master page.
Example 2. CSS styling of navigation
<style type="text/css">
.s4-ca {
margin-left: 0px;
}
.srch-sb-results {
background:transparent none repeat scroll 0 0;
}
.srch-sb-main {
padding-top: 20px;
}
.srch-sb-results4 {
margin: inherit;
padding-left: 20px;
}
.ms-bodyareaframe {
background-color: transparent;
}
td.ms-titleareaframe, div.ms-titleareaframe, .ms-pagetitleareaframe {
height: auto !important;
}
.ms-main .ms-ptabrx, .ms-main .ms-sctabrx, .ms-main .ms-ptabcn, .ms-main .ms-sctabcn {
border-color: #eeeeee;
}
.srch-sb-results {
height: auto;
}
.ms-sblink {
display:block;
}
.ms-sblink a:link, .ms-sblink a:visited, .ms-sblink a:hover {
color:#0072BC;
}
</style>
|
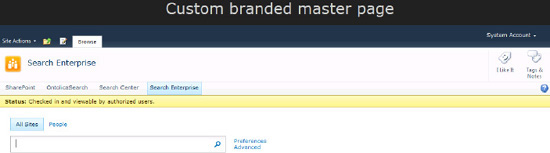
Finally, save and publish the
new master page. It should be set only for search centers. The result
will be that the search dialog now shows correctly as seen in Figure 4.
After these changes, the
search center now reflects the custom branded master page in a still
easy-to-maintain version. This techniques can also be used to create
master pages with search center–specific branding.